Sconce & Socket earns a commission on qualifying purchases made through links on this page, at no extra cost to you. It does not change which products we pick. Full disclosure.
| # | Product | Best for | Lumens | Price |
|---|---|---|---|---|
| 01 |  Enbrighten 18 in. Plug-in Under Cabinet Light Bar (82785-T1) Kitchen counters, no wiring, no compromise on color | Plugs in. Mounts with the supplied adhesive or two screws - adhesive keeps the deposit. | 1,245 lm | $34.98 - View on Amazon #ad Price as of October 18, 2026. How we earn |
| 02 | 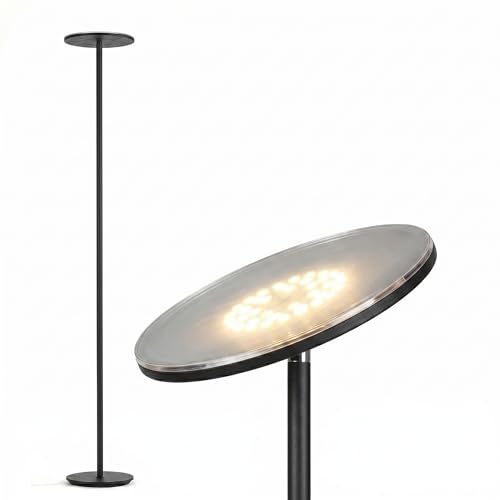 Brightech Sky LED Torchiere Floor Lamp Whole-room light from one outlet | Plugs into an outlet. No drilling, no fixing, no ceiling box. | 2,190 lm | $74.99 - View on Amazon #ad Price as of October 18, 2026. How we earn |
| 03 |  Philips Ultra Definition A19 LED, 60W equivalent, 2700K The default bulb for almost every lamp in a home | It is a bulb. Swap it, keep the old one, put it back when you leave. | 800 lm |
Specifications are the manufacturer or retailer published figures, compiled by hand. We have not measured them, and where a figure is not published we write "Not published" rather than guess.
01
Five methods, ranked
| Method | How invisible | Effort | Best for |
|---|---|---|---|
| Route behind furniture | Completely, if it works | None | Floor lamps near a sofa or bookcase |
| Adhesive cord channel, painted | Nearly | 30 min plus paint drying | Sconces and pendants on a visible wall |
| Adhesive cord clips at intervals | Good at a distance | 10 min | Cords following a baseboard or corner |
| Match the cord color to the wall | Good | Buy the right one | Anywhere - do this as well as the above |
| Flat under-rug cover | Complete underfoot | 20 min | Crossing an open floor - the only safe way |
Do the free one first. A surprising share of cord problems are solved by moving the lamp two feet, or by running the cord down the back of a bookcase instead of across a wall. Look at the route before buying anything.
02
Cord channel, done properly
Adhesive cord channel is a shallow plastic or metal raceway with a clip-on cover. Painted to match the wall it disappears almost entirely from any normal viewing distance, and it is the right answer for a sconce or pendant on a wall you look at.
- Plan a straight run. Vertical down from the fixture, then horizontal along the top of the baseboard. Right angles read as deliberate; diagonals read as a cable.
- Paint the cover before fitting it. Two thin coats of the wall color, fully dry. Painting it in place gets paint on the wall and never covers the edges properly.
- Clean the wall with isopropyl alcohol and let it dry before sticking anything.
- Test the paint first, on new paintwork. Stick a short offcut in a hidden spot, leave it a day, and pull it. Paint under about a month old has not fully cured and can lift.
- Lay the cord loosely in the channel. A cord stretched tight in a raceway pulls the whole thing off the wall over time.
03
What not to do
Most of this category is a tidiness question. Three things are not:
- Never run an ordinary round cord under a rug. It is a trip hazard and the rug traps heat around the cable. Flat under-rug covers exist precisely because this is the one route people take anyway.
- Never tape a cord across a doorway or walkway. Tape lifts, catches a foot, and the fixture comes down with it. Re-plan the route or move the lamp.
- Never run a cord through a wall or under a door frame. A cable passing through structure is fixed wiring by any sensible reading, and the insulation is not rated for it.
None of that is a reason to avoid plug-in lighting. It is a reason to spend ten dollars on the correct cover rather than improvising, and it is the whole difference between plug-in fixtures being a good idea and a bad one.
The picks
The products behind this page
01
Kitchen counters, no wiring, no compromise on color
Enbrighten 18 in. Plug-in Under Cabinet Light Bar (82785-T1)
#ad Price as of October 18, 2026. How we earn
1,245 lumens at 92 CRI with five white settings from 2700K to 6500K, on a plug - the rare renter-safe fixture that beats most hardwired ones on light quality.
| Lumens | 1,245 lm |
|---|---|
| Color temperature | 2700K-6500K, five settings |
| CRI | 92 |
| Power source | Plugs in |
| Dimmable | Yes - full range |
| Renter-safe method | Plugs in. Mounts with the supplied adhesive or two screws - adhesive keeps the deposit. |
What it gets right
- 92 CRI, so food and worktops read true rather than gray
- Five color temperatures means you tune it to the room, not the box
- Full-range dimming, not a two-step hi/low
What it costs you
- The cord has to reach an outlet and then be hidden
- 18 inches is longer than some cabinet sections allow
- One more power adapter on a kitchen outlet
Spec source: Enbrighten product page - retrieved September 3, 2026.
02
Whole-room light from one outlet
Brightech Sky LED Torchiere Floor Lamp
#ad Price as of October 18, 2026. How we earn
The one lamp here that publishes its own output: 2,190 lumens at 3000K from an integrated LED, aimed at the ceiling so the whole room lifts rather than one corner.
| Lumens | 2,190 lm |
|---|---|
| Color temperature | 3000K |
| CRI | Not published |
| Power source | Plugs in (corded, 30W integrated LED) |
| Dimmable | Yes - touch dimmer on the pole |
| Renter-safe method | Plugs into an outlet. No drilling, no fixing, no ceiling box. |
What it gets right
- Publishes a real lumen figure, which most lamp brands do not
- 3000K is the safest single color temperature for a shared living space
- Uplight bounces off the ceiling, so it fills a room instead of pooling
What it costs you
- Integrated LED - when it eventually fails you replace the lamp, not a bulb
- CRI is not published, so color accuracy is unknown
- Needs about 10 inches of floor space and a nearby outlet
Spec source: Brightech product page - retrieved September 3, 2026.
03
The default bulb for almost every lamp in a home
Philips Ultra Definition A19 LED, 60W equivalent, 2700K
800 lumens at 2700K with a published CRI 95 for the price of an ordinary bulb - the single easiest upgrade in this entire category.
| Lumens | 800 lm |
|---|---|
| Color temperature | 2700K |
| CRI | 95 |
| Power source | Screws into a standard E26 socket (8W) |
| Dimmable | Yes |
| Renter-safe method | It is a bulb. Swap it, keep the old one, put it back when you leave. |
What it gets right
- CRI 95 at a mainstream price, which almost nothing else manages
- 2700K matches the warm light most rooms were designed around
- Dimmable and rated flicker-free
What it costs you
- 800 lumens is one bulb's worth - a dark room needs several
- 2700K is too warm for detailed kitchen task work
- R9 is not published, so deep reds are an unknown
Spec source: Home Depot listing - retrieved September 3, 2026.
FAQ
Questions people actually ask
+How do you hide a plug-in light cord in a rental?
Adhesive cord channel painted to match the wall is the tidiest option, followed by small adhesive cord clips at intervals, or simply routing the cord behind furniture. All three come off cleanly with a little heat and leave nothing behind.
+Can you run a cord under a rug?
Only with a flat under-rug cord cover designed for it. An ordinary round cord under a rug is both a trip hazard and a heat trap, and it is the one shortcut in this category that is genuinely unsafe rather than just untidy.
+Should I paint the cord to match the wall?
Do not paint the cord itself - paint can crack, and it interferes with the insulation's ability to flex. Paint the channel or the clips instead, which is what they are made for, and buy the cord in the closest available color to the wall.
+Does adhesive cord channel damage paint?
It can, on freshly painted or poorly prepared walls. Warm it with a hairdryer and pull slowly parallel to the wall to remove it. On paint under about a month old, use low-tack painter's tape as an underlayer instead.
Sources
Where the numbers came from
- Seus Lighting - Lighting without wiring: wireless solutions for US homes
- Style by Emily Henderson - The case for plug-in sconces and non-hardwired lighting
All sources retrieved September 3, 2026.
Next
Read these next
About the author
Sawyer V. An enthusiast who reads the spec sheets and does the arithmetic. No lab, no test bench.